Baurine's Blog
React Hooks
July 30, 2020最近在公司前端组做了一次关于 react hooks 的简单分享,本文是对分享内容的整理。
主要分了三块讲:
- Why
- What
- How
Part 1 - Why
先来看一张我在 twitter 上看到的一张图片:
react hooks 一经发布,就迅速流行,并取代了 HOC 和 render props 两种 react pattern。这说明 react hooks 为我们解决了一些痛点问题,那么这些痛点是什么呢。
我们先来看一下在 hooks 之前人们在用 react 时常抱怨的一些问题。
- 存在两种组件,Function 组件 (纯函数,无状态) 及 class 组件。当需要往 Function 组件中加入状态时,需要完全改写成 class 组件,修改大。
- class 组件:生命周期函数多 (头大)
- class 组件:this 指针问题 (需要使用一堆 bind,或是箭头函数)
- class 组件:经常需要在不同的生命周期中写重复代码,比如 componentDidMounted 和 componentDidUpdate
- ...
还有最重要的,组件之间很难复用状态逻辑,因为会被生命周期函数所割裂。
所谓的状态逻辑,就是管理状态的逻辑,比如很多组件都有 loading 状态。组件在初始化的 loading 状态先置为 true,然后去获取数据,待取回数据成功或失败后,将 loading 置为 false。
但就是 loading 这样简单的状态管理,在 react 中我们都很难把它的管理逻辑抽取成独立的函数或 class 来在组件间进行复用。因为 loading 值的改变和组件的生命周期强相关。它要在 componentDidMounted 中置为 true,然后执行某种异步操作,根据结果再将 loading 的值置为 false。因为和生命周期绑在了一起,而只有组件才有生命周期,导致它们只能依附于组件中。
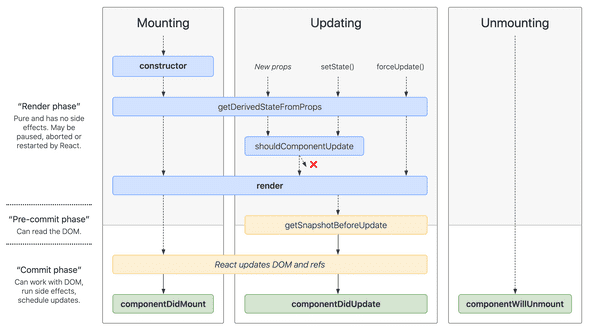
这是 class 组件完整的生命周期:
像 getDerivedStateFromProps() 和 getSnapshotBeforeUpdate() 其实很少人能搞懂到底啥时用,怎么用。
再看一个官方提供的需要在不同的生命周期中写重复代码的示例:
componentDidMount() {
  ChatAPI.subscribeToFriendStatus(
    this.props.friend.id,
    this.handleStatusChange
  );
}

componentDidUpdate(prevProps) {
  // unscribe from the previous friend.id
  ChatAPI.unsubscribeFromFriendStatus(
    prevProps.friend.id,
    this.handleStatusChange
  );
  //subscribe to the next friend.id
  ChatAPI.subscribeToFriendStatsu(
    this.props.friend.id,
    this.handleStatusChange
  );
}

componentWillUnmount() {
  ChatAPI.unsubscribeFromFriendStatus(
    this.props.friend.id,
    this.handleStatusChange
  );
}
HOC 和 render props
在 hooks 之前,为了实现状态逻辑的复用,我们常见的两种实现是
- HOC (High Order Component),即高阶组件
- render props
而它们并不怎么优雅。
我们以 MousePosition 为例。假如有多个不同的组件都要显示当前鼠标坐标,展现的形式各不相同。但是,获取鼠标坐标的逻辑却是一样的,即在 componentDidMounted 的时候去监听 mousemove 事件,然后将坐标值设置到 state 中。这些组件唯一的区别就是展示形式的不同。实现大致如下:
class ComponentA extends React.Component{
  constructor(props) {
    super(props)
    this.state = {
      x: 0,
      y: 0
    }
    this.onMouseMove = this.onMouseMove.bind(this)
  }

  onMouseMove(ev) {
    this.setState({
      x: ev.pageX,
      y: ev.pageY,
    })
  }
  componentDidMount() {
    window.addEventListener('mousemove', this.onMouseMove)
  }
  componentWillUnmount() {
    window.removeEventListener('mousemove', this.onMouseMove)
  }

  render() {
    return (
      // 各组件不同的展示形式
    )
  }
}
我们肯定是不想将获取坐标的逻辑在每一个组件都写一份,所以很有必要将这一部分逻辑抽取出来复用。又因为这部分逻辑和生命周期强相关,我们只能将这一部分逻辑抽取出来成为一个无 UI 的容器组件,而展示鼠标坐标的组件成为纯展示型组件。我们在这些展示型组件之上包装一层含有获取鼠标坐标的容器组件,将坐标以 props 传递给展示型组件。这就是所谓的高阶组件 HOC。
此例我们将其命名为 withMousePosition,实现如下:
function withMousePosition(MyComponent) {
  return class MousePotionComp extends React.Component {
    constructor(props) {
      super(props)
      this.state = {
        x: 0,
        y: 0,
      }
      this.onMouseMove = this.onMouseMove.bind(this)
    }
    onMouseMove(ev) {
      this.setState({
        x: ev.pageX,
        y: ev.pageY,
      })
    }
    componentDidMount() {
      window.addEventListener('mousemove', this.onMouseMove)
    }
    componentWillUnmount() {
      window.removeEventListener('mousemove', this.onMouseMove)
    }
    render() {
      return (
        <div className="mouse-position-container">
          <h1>Mouse Position:</h1>
          <MyComponent mousePos={this.state} {...this.props} />
        </div>
      )
    }
  }
}
使用:
const Position = ({ pos, extra }) => (
  <p>
    x:{pos.x}, y:{pos.y}, extra: {extra}
  </p>
)
const WrapMousePosition = withMousePosition(Position)
function App() {
  return <WrapMousePosition extra="test" />
}
假设我们同时要在这些组件上显示 window 的尺寸 (resize 时要实时更新),那么很显然我们可以实现一个 withWindowSize() 的高阶组件函数。然后使用如下:
const WrapComponent = withWindowSize(withMousePosition(MyComponent))看出这里的问题所在了吗?本来如果不复用状态逻辑的话,可以把这些逻辑放在同一个组件里,最终只有一层;而现在却嵌套了三层,有了三层组件,多的两层组件其实本不需要。
再来看 render props pattern,它的 children 是一个函数,而不是普通对象。看一下示例代码就明白了:
class MousePosition extends React.Component {
  constructor(props) {
    super(props)
    this.state = {
      x: 0,
      y: 0,
    }
    this.onMouseMove = this.onMouseMove.bind(this)
  }
  onMouseMove(ev) {
    this.setState({
      x: ev.pageX,
      y: ev.pageY,
    })
  }
  componentDidMount() {
    window.addEventListener('mousemove', this.onMouseMove)
  }
  componentWillUnmount() {
    window.removeEventListener('mousemove', this.onMouseMove)
  }
  render() {
    return (
      <div className="mouse-position-container">
        <h1>Mouse Position:</h1>
        {this.props.children(mousePos)} {/* children 是函数 */}
      </div>
    )
  }
}
使用:
const Position = ({ pos }) => (
  <p>
    x:{pos.x}, y:{pos.y}
  </p>
)

function App() {
  return (
    <MousePosition>{(mousePos) => <Position pos={mousePos} />}</MousePosition>
  )
}
写法上会比 HOC 省点代码 (个人感觉)。
同理,如果想同时显示 window size,我们抽取 WindowSize 组件,最终代码如下:
function App() {
  return (
    <WindowSize>
      {(size) => (
        <MousePosition>
          {(mousePos) => <MyComponent pos={mousePos} size={size} />}
        </MousePosition>
      )}
    </WindowSize>
  )
}
同样产生了三层嵌套。
为啥要嵌套
mouse pos,window size 这些与生命周期相关的状态逻辑,和最终的展示 UI,理论上应该是可以平级的,不需要嵌套。
只是因为一切皆组件,只有组件才有生命周期,这些抽取用来复用的状态逻辑必须以组件的形式存在,才造成了无谓的嵌套。
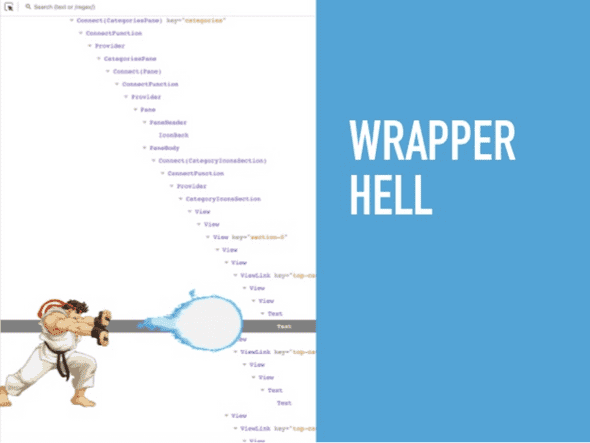
无谓的嵌套多了,就容易产生嵌套地狱。
React Hooks
天下苦秦久已。
正如大家对 js 的回调地狱厌恶已久,所以才有了 promise,async & await。
react hooks 一经问世,就立马将 hoc 和 render props 打入了后宫。
先来看一下用 react hooks 是如何实现上面相同的需求的。
定义 useMousePos 和 useWindowSize hooks。
import { useState, useEffect } from 'react'

export function useMousePos() {
  const [pos, setPos] = useState({ x: 0, y: 0 })

  useEffect(() => {
    function handleMouseMove(ev) {
      setPos({ x: ev.pageX, y: ev.pageY })
    }
    window.addEventListener('mousemove', handleMouseMove)
    return () => window.removeEventListener('mousemove', handleMouseMove)
  }, [])

  return pos
}

export function useWindowSize() {
  const [size, setSize] = useState({ width: 0, height: 0 })

  useEffect(() => {
    function handleResize() {
      setSize({
        width: window.innerWidth,
        height: window.innerHeight,
      })
    }
    handleResize()
    window.addEventListener('resize', handleResize)
    return () => window.removeEventListener('resize', handleResize)
  }, [])

  return size
}
使用:
function MyComponent() {
  const mousePosition = useMousePos()
  const windowSize = useWindowSize()

  return (
    <p>
      x: {mousePosition.x}
      y: {mousePosition.y}
      width: {windowSize.width}
      height: {windowSize.height}
    </p>
  )
}
非常扁平有木有!毫无多余的嵌套。
Part II - What
所以,React Hooks 到底是啥呢。
官方的解释:
它可以让你在不编写 class 的情况下使用 state 以及其它的 React 特性。
详细说来,则是:
- 没有 class 啦,以后就全部用 function 来写 component 了 (nice!)
- 不再有 this 指针问题 (nice!)
- 不再有诸多显式的生命周期函数 (隐含在内部 nice!)
- 自定义 hook,非常方便地复用状态逻辑,且不用和组件嵌套,很扁平 (即插即用,自由组合,awesome!)
- UI 和状态更易分离 (除 UI 外的逻辑可以全部塞到一个或多个自定义 hook 中,awesome!)
基本上把前面人们抱怨的痛点都解决了。
当然,也要付出一点点成本:
- 对闭包的理解要求很高
- 使用上要更加小心谨慎,使用不慎容易引起无限刷新;手工管理依赖,有心智负担 (有插件可以帮忙)
Part III - How
前面说了这么多 React Hooks 的好处,简直快要吹上天了,那到底怎么用呢 (擦掌.png)
React 提供了以下几个主要的 primitive hooks:
- useState
- useEffect
- useMemo
- useCallback
- useRef
- useContext
- useReducer
所有的 react hooks 的命名都必须符合 useXxx 的格式。我们可以用上述的原子 hooks 去组合各种自定义的 hooks。
useState
顾名思义,就是用来处理 state 的。先来看一下示例代码:
import React, { useState } from 'react'

function Example() {
  // 声明一个叫 "count" 的 state 变量
  const [count, setCount] = useState(0)

  return (
    <div>
      <p>You clicked {count} times</p>
      <button onClick={() => setCount(count + 1)}>Click me</button>
    </div>
  )
}
useState() 同时返回一个 state 的值和修改函数。执行修改函数去修改 state 时,就和之前的 setState() 一样,会触发组件的重绘。
在 class 组件中,所有 state 是存放在 this.state 对象中,而且 hooks 组件中,更推荐将大的 state object 拆成多个小的 state object。
对比:
// before
this.state = { age: 10, gender: 'male' }

// after
const [age, setAge] = useState(10)
const [gender, setGender] = useState('male')
另外,在 class 组件中,连续多个 setState() 调用内部会 merge 成一次 setState,最终只触发一次 render。但 hooks 组件,连续的 setState 不会进行 merge,每一次 setState 都会触发 render。
useState() 的参数还可以接受函数。假如初始 state 是通过函数计算得来的,比如 useState(initState()),每次 render 的时候,initState() 也会重新执行一遍,但它的值只在第一次的时候有效,后面的执行都没有意义。如果 initState() 执行的代价比较大,我们想让它只在第一次执行,则可以写成 useState(() => initState())。
useEffect
顾名思义,是用来执行副作用的,比如访问网络,监听 DOM 等。相当于 class component 中的 componentDidMounted / componentDidUpdate / componentWillUnmout 等生命周期的集合。
语法:useEffect(() => {...}, [deps])
它会在 render 之后且 deps 发生改变时执行里面的逻辑。
它和 useState 是使用率最高的两个 hooks,也是使用最复杂的一个 hooks。
它有一篇很详细的使用指南必须且反复看:useEffect 完整指南
先回顾一下前面的一个例子:
componentDidMount() {
  ChatAPI.subscribeToFriendStatus(
    this.props.friend.id,
    this.handleStatusChange
  );
}

componentDidUpdate(prevProps) {
  // unscribe from the previous friend.id
  ChatAPI.unsubscribeFromFriendStatus(
    prevProps.friend.id,
    this.handleStatusChange
  );
  //subscribe to the next friend.id
  ChatAPI.subscribeToFriendStatsu(
    this.props.friend.id,
    this.handleStatusChange
  );
}

componentWillUnmount() {
  ChatAPI.unsubscribeFromFriendStatus(
    this.props.friend.id,
    this.handleStatusChange
  );
}
有不少重复代码,而使用 useEffect 后,重复代码就没有了,而且把这些生命周期都统一了。
useEffect(() => {
  function handleStatusChange(status) {
    setIsOnline(status.isOnline)
  }

  ChatAPI.subscribeToFriendStatus(props.friend.id, handleStatsuChange)
  return () => {
    ChatAPI.unsubscribeFromFriendStatus(props.frined.id, handleStatusChange)
  }
}, [props.friend.id]) // only re-subscribe if props.friend.id changes
useEffect() 的第二个参数是依赖列表 deps,如果 deps 不写,即 useEffect(() => {...}),则每次 re-render 的时候 useEffect 中的函数都会执行,如果这个函数是去访问 API,则后果就是会不停地访问 API。
如果 deps 写成空数组 [],则只在初次 render 后执行一次,相当于 componentDidMount() 的效果。
useMemo / useCallback
这两个 hooks 是用来优化性能的,useMemo 用来缓存值,而 useCallback 则是用来缓存方法。
useMemo
例子:
function MyComponent() {
  const [arr, setArr] = useState([])
  const sortedArr = sort(arr)  // expensive
  //...

  return <ul>{sortedArr.map(...)}</ul>
}
假设 sort() 方法很耗时间,每次 re-render 的时候都要重新执行 sort(),即使 arr 没有变动。这种情况我们可以用 useMemo 进行优化:
const sortedArr = useMemo(() => sort(arr), [arr])这样,只有 arr 变化时才会重新执行 sort(arr)。
useCallback
示例:
function handleStatusChange(status) {
  setIsOnline(status.isOnline)
}

useEffect(() => {
  ChatAPI.subscribeToFriendStatus(props.friend.id, handleStatusChange)
  return () => {
    ChatAPI.unsubscribeFromFriendStatus(props.friend.id, handleStatusChange)
  }
}, [props.friend.id, handleStatusChange])
这段代码会产生一个问题:死循环。
每次 render 后,handleStatusChange 这个函数就会重新生成,因此它变化了,从而导致 useEffect() 中的逻辑执行,它会执行 ChatAPI.subscribeToFriendStatus(props.friend.id, handleStatusChange) 重新订阅朋友的状态,并最终执行 handleStatusChange 回调,在 handleStatusChange 回调中,它调用 setIsOnline() 改变 state,从而触发 re-render,然后 handleStatusChange 又会重新生成,导致 useEffect() 中的逻辑执行 ... 周而复始。
为了让 handleStatusChange 每次 render 时不再重新生成,我们可以用 useCallback 把它缓存住。
const handleStatusChange = useCallback(
  (status) => setIsOnline(status.isOnline),
  []
)
useRef
useRef 一般用来存储 mutable 的对象,修改 ref 对象不会像修改 state 那样触发重绘。
常见用途是用来操作 DOM。示例:
function TextInputWithFocusButton() {
  const inputEl = useRef(null)
  const onButtonClick = () => {
    // `current` points to the mounted text input element
    inputEl.current.focus()
  }

  return (
    <div>
      <input ref={inputEl} type="text" />
      <button onClick={onButtonClick}>Focus the input</button>
    </div>
  )
}
其它用法,相关链接:
示例:
function Counter() {
  const [count, setCount] = useState(0)

  useEffect(() => {
    const id = setInterval(() => {
      setCount(count + 1)
    }, 1000)
    return () => clearInterval(id)
  }, [])

  return <h1>{count}</h1>
}
这段代码的本意是想实现一个计数器,每秒将计数值加 1,但实际,最终渲染的永远是 1。因为闭包的原因,useEffect() 中的 count 的值一直是最初始的 0,因此 setCount(count + 1) 其实是 setCount(0 + 1)。
此例中,最简单的一种解决办法是将 setCount(count + 1) 改成 setCount(prev => prev + 1)。
另外,我们也可以用 ref 来解决。
function Counter() {
  const [count, setCount] = useState(0)
  const myRef = useRef(null)
  myRef.current = () => {
    setCount(count + 1)
  }
  useEffect(() => {
    const id = setInterval(() => {
      myRef.current()
    }, 1000)
    return () => clearInterval(id)
  }, [])

  return <h1>{count}</h1>
}
useContext
Provider:
const themes = {
  light: {
    foreground: '#000000',
    background: '#eeeeee',
  },
  dark: {
    foreground: '#ffffff',
    background: '#222222',
  },
}

const ThemeContext = React.createContext(themes.light)

function App() {
  return (
    <ThemeContext.Provider value={themes.dark}>
      <Toolbar />
    </ThemeContext.Provider>
  )
}

function Toolbar(props) {
  return (
    <div>
      <ThemedButton />
    </div>
  )
}
Consumer,三种用法:
function ThemedButton() {
  return (
    <ThemeContext.Consumer>
      {(theme) => (
        <button
          style={{ background: theme.background, color: theme.foreground }}
        >
          I am styled by theme context!
        </button>
      )}
    </ThemeContext.Consumer>
  )
}

class ThemedButton extends React.Component {
  static contextType = ThemeContext
  render() {
    const theme = this.context
    return (
      <button style={{ background: theme.background, color: theme.foreground }}>
        I am styled by theme context!
      </button>
    )
  }
}

function ThemedButton() {
  const theme = useContext(ThemeContext)
  return (
    <button style={{ background: theme.background, color: theme.foreground }}>
      I am styled by theme context!
    </button>
  )
}
useReducer
略。
自定义 hooks
前面举过的例子,useMousePos,useWindowSize 都是自定义 hooks。
function useMousePos() {
  const [pos, setPos] = useState({ x: 0, y: 0 })

  useEffect(() => {
    function handleMouseMove(ev) {
      setPos({ x: ev.pageX, y: ev.pageY })
    }
    window.addEventListener('mousemove', handleMouseMove)
    return () => window.removeEventListener('mousemove', handleMouseMove)
  }, [])

  return pos
}
自定义 hooks 实际是与组件生命周期相关,但不包含组件的可复用状态逻辑,不能单独使用,在组件中使用才有意义,在普通函数中使用毫无意义。
它和 HOC, render props 最大的不同是摆脱了定义时必须依附于组件,必须定义成组件的形式。
参考
扩展思考
为什么 Android/iOS 传统的原生界面开发方案没有 React 这些问题,因为 React 的思想是一切皆组件,每个小的组件都拥有独立的生命周期。而 Android/iOS 却不是这样,它们的组件只是 view,只用来处理交互和绘制,不处理副作用 (如访问网络,IO),只有最顶层的作为 view 的容器的 activity/controller,才有生命周期,一切副作用和状态的管理都只在 controller 中进行,所以导致 controller 容易臃肿。
React Hooks 与 Android Lifecycle
(这一块没想得特别清楚,但觉得这两者思想上是有一些相似的)
Android Lifecycle 是 Android 中用来简化开发的 JetPack 套件中的一个组件。以前写过一篇学习笔记:Android Architecture Components Note
Android 中的 activity 和 React 中的 class 组件类似,有不同的生命周期,比如 onCreate(), onStart(), onStop() ...
当我们想在不同的生命周期中做不同的事情时,我们不得不把逻辑分散写到 activity 的各个生命周期中。以地理位置监听器为例,要在 onCreate() 时创建监听器,onStart() 时开始监听,在 onStop() 时停止监听。像下面这样:
class MyActivity extends AppCompatActivity {
  private MyLocationListener myLocationListener;
  // 其它对象,比如音乐播放器
  private MusicPlayer musicPlayer;

  public void onCreate(...) {
    myLocationListener = new MyLocationListener(...);
    // 初始化其它对象
    musicPlayer = new MusicPlayer();
  }

  public void onStart() {
    super.onStart();
    myLocationListener.start();
    // 开始其它对象
    musicPlayer.start()
  }

  public void onStop() {
    super.onStop();
    myLocationListener.stop();
    // 停止其它对象
    musicPlayer.stop();
  }
}
当我们要在另一个 activity 中做同样的事情时,我们不得不把这些逻辑再写一遍,分散在各个生命周期函数中。
能不能把这些跟生命周期绑定的逻辑抽出来,集中写到一个地方呢,比如一个 class 里。之后任何 activity 里想用的时候,只要 new 一个对象即行了?
Android Lifecycle 就是用来干这个的,它达到了和 react hooks 相似的结果,即可以将和生命周期相关的逻辑抽取出来写到一个地方,集中管理,也很好在各 activity 中复用。
而它实现的方法是监听器。(观察者模式,观察者模式可以解耦,实现控制反转?)
实现如下:
public class MyLocationObserver implements LifecycleObserver {
  private MyLocationListener myLocationListener = new MyLocationListener(...);

  @OnLifecycleEvent(Lifecycle.Event.ON_START)
  public void onStart() {
    myLocationListener.start()
  }

  @OnLifecycleEvent(Lifecycle.Event.ON_RESUME)
  public void onResume() {
    //...
  }

  @OnLifecycleEvent(Lifecycle.Event.ON_PAUSE)
  public void onPause() {
    //...
  }

  @OnLifecycleEvent(Lifecycle.Event.ON_STOP)
  public void onStop() {
    myLocationListener.stop()
  }
}
咋一看,这代码和前面没区别呀。其实是有的,前者是在每个生命周期里都操作多个对象,但后者是管理一个对象的所有生命周期。
这样,我只要在需要用到 MyLocationListener 的 activity 里 new 一个 MyLocationObserver 就够了。
伪代码如下所示 (太久没写 Android 了,实际可能稍微复杂一点点):
class MyActivity extends AppCompatActivity {
  private MyLocationObserver myLocationObserver = new MyLocationObserver();
  // 其它对象
  private MusicPlayerObserver musicPlayerObserver = new MusicPlayerObserver();
}
MyLocationObserver 在内部管理了所有生命周期。是不是很类似 React 中的一个自定义 hooks 呢?
从 React Hooks 得到的启发
从 React Hooks 得到的启发之一:相同功能的东西 (比如代码) 放在一起,而不是相同类型的放到一起。
对于 class 组件来说,我们在一个生命周期执行多个不同的操作,比如:
componentDidMount() {
  // action 1
  ChatAPI.subscribe(...)

  // action 2
  musicPlayer.start()
}

componentWillUnmount() {
  ChatAPI.unsubscribe(...)

  musicPlayer.stop()
}
这相当于是把不同的功能的相同生命周期函数放在了一起。缺点前面说了,不好复用。
而对于 react hooks 来说,则是把同一个功能的所有生命周期放在一起管理。实现了极好的复用。
再举个例子。在一个前端项目中,我们可能会把代码划分成 service, model, action, reducer 等不同的类型,同时有多个功能,每个功能都有各自的 service / model / action / reducer。
一种组织代码的方式是:顶层是 service / model / action / reducer,然后把所有功能的 service 代码都放在 service 中,把所有功能的 model 都放在 model 目录中 ... 像下面这样:
- service
  - fun_a
    - fun_a_service_1
    - fun_a_service_2
  - fun_b
    - fun_b_service_1
    - fun_b_service_2
- model
  - fun_a
    - fun_a_model_1
    - fun_a_model_2
- ...
另一种组织代码的方式是:按功能划分,顶层是各个功能目录,然后在每个功能目录下,都有自己独立的 service/model/action/reducer。
- fun_a
  - service
    - fun_a_service_1
    - fun_a_service_2
  - model
    - fun_a_model_1
    - fun_a_model_2
  - ...
- fun_b
  - service
    - fun_b_service_1
    - fun_b_service_2
  - model
    - fun_b_model_1
    - fun_b_model_2
  - ...
- ...
后者有一个好处,当不需要某个功能时,直接把这个功能模块整个目录删掉就好了,而前者需要去每个目录删点东西。
修改某个功能时,前者需要去每个目录改点东西,而后者只会影响功能模块内部目录。
总来的说,后者更能体现模块性和独立性。
也能影响到我们平时其它地方,比如文档的目录结构。是按 notes/codes/images 划分,还是按 react/vue/angular 这样划分。
- notes
  - react.md
  - vue.md
  - angular.md
- codes
  - react
  - vue
  - angular
或是:
- react
  - note.md
  - codes
- vue
  - note.md
  - codes
一个实际案例:
每个功能模块下都有自己的 pages / components / utils。
按功能模块划分,而不按类型划分。


